Measuring SWR
Measuring SWR and Things Every CB'er Should
Know
PLUS NEW SPECIAL SECTION ON COAX CABLE
PROCESSING
from Firestik®; Antenna Co. Technical Support
Copyright © 1996 Firestik® Antenna Company

Contents of this Page
SWR Testing of Mobile Transmit Antennas
63 Things Every CB'er Should Know
Testing Continuity
Setting the SWR of Your Antenna
Coax Cable Processing with Firestik Connectors
Return to Home Page

SWR TESTING OF MOBILE TRANSMIT ANTENNAS
SWR (standing wave ratio) is a term every CB'er should know. SWR (measured
with an SWR meter) shows you how well your coax, antenna mount, ground plane
and antenna match the output capability of your CB radio. It is a ratio of maximum
voltage or current to minimum voltage or current. Generally speaking, the lower
the ratio the better. Defective or inferior components, bad installations and
antennas not tuned to the specific location on the vehicle increases the SWR. You
should strive to achieve a ratio below 2:1 on all channels.
Before measuring and setting SWR, it is helpful to know some of the things that can
cause problems. Spend a few minutes to read this entire pamphlet and you will go
into your project with valuable knowledge. It could save you a lot of time, effort
and possibly, money.
Unlike receive only antennas (AM/FM radio, TV, scanner), antennas that transmit
require tuning. Antenna manufacturers can supply you with an antenna that is
pre-tuned to the general frequency of the intended equipment, but they cannot
promise you perfect performance "out of the box". The six needed components for
a mobile installation are the radio, power feed, coaxial cable, antenna mount,
antenna, and ground plane (counterpoise). Even if the manufacturer supplies you
with an entire kit (coax, mount & antenna), this, in most cases, leaves you without
the counterpoise requirement. There is an exception to this general rule; antenna
systems that use the coax cable as a counterpoise. These no-ground-plane kits are
generally marketed to owners of fiberglass vehicles. However, for most
applications, the mobile antenna will use the vehicle's body as counterpoise.
Unless otherwise stated, the following information pertains to installations that DO
NOT use coaxial counterpoise antennas.
The vehicle, in mobile installations, is just as important as the antenna and other
components. The antenna is the radiating unit, the vehicle is the reflecting unit. All
transmit antennas need a reflective unit. What effect does the vehicle have? Plenty!
If you were to install and tune your antenna on a bumper mount then move it to the
roof, you would see a change in the SWR. This is due to the change in the antenna's
position relative to the vehicle surface. Location is important.
It isn't always feasible, or practical to mount the antenna in the optimum position
on any vehicle. Nonetheless, whenever you set aside performance for convenience,
you will need to settle for what you can get. Regardless, plan on tuning your
antenna. Tuned antennas will give you the best performance you can expect from an
antenna mounted in any given location. Most of all, remember that untested
installations can cost you big bucks. Operating transmitting radios when the SWR
is over 3:1 can damage the radios circuits. Always check your SWR and tune your
antenna.
There is a lot to know about transmitting antennas. Even if you have your system
installed by a professional, it is helpful for you to know what can effect its
performance. The following list was compiled from 20 plus years of technical
support files. It represents the areas where most of the performance robbing
problems crop up. We highly recommend that you read it. The problems and
solutions came from real life situations. Starting with knowledge is always better
than learning from disappointment. A step by step SWR measuring and antenna
tuning procedure follows this very informative list.
THINGS EVERY CB'ER SHOULD KNOW
- Every industry has its bottom dwellers. We cannot protect you from them.
Consumers who make decisions based strictly on price, or on what someone
says instead of what they can do, will often fall prey to the bottom
dwellers.
- Beware of information from "experts" (real or self-proclaimed). There is
antenna theory and there is antenna reality. We have yet to see a vehicle that
simulates a lab. While theory is a good starting place...experience is the only
place to end up. The best book on theory will produce the worst antenna you
could own.
- Some "experts" may "claim" 5/8 wave mobile antennas are not possible
because they would need to be 23 feet high. They are wrong! Physical length
and ground wave performance are not the same. If you ever hear someone
make that claim, ask them how a handheld CB can have a 1/4 wave antenna 8
inches long and 1/4 wave mobile antennas from 12-60 inches long in spite of
the fact that a physical 1/4 wave is 108 inches.
- Never key up or attempt to operate your CB without a working antenna or
"dummy load" (non-radiating antenna simulating device) connected to the
radios antenna jack, unless you have extra money to buy another radio.
- All mobile and base transmitting antennas need counter-poise, more
commonly called ground plane. The antenna is the reactive unit, the ground
plane is the reflective unit. Neither is more important than the other. In mobile
installations with standard antenna systems, the vehicle metal (body, frame,
etc.) acts as the ground plane. In "no-ground-plane" systems, the coax shield
is used for counterpoise.
- Most, but not all, manufacturers pre-tune their mobile antennas on a test
bench. To protect your radio's circuitry and achieve optimum performance,
mobile transmitting antennas (CB, cell phone, amateur, etc.) need to be tuned
on the vehicle.
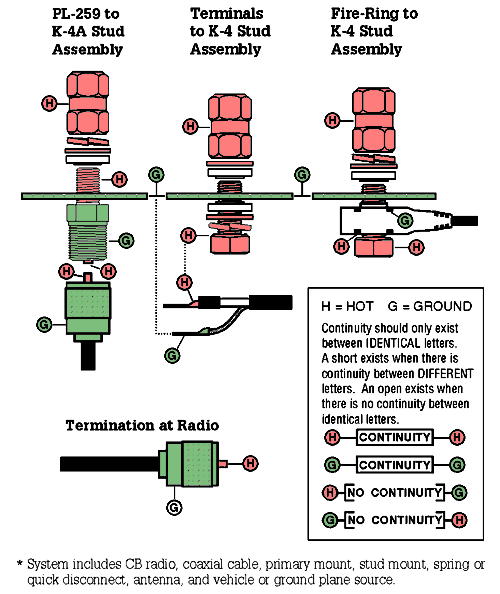
- Before transmitting, you should check your antenna system for shorts or
opens. If you have continuity between the center pin of the connector and the
outer threaded housing, you may have a short. Don't transmit! If you do not
find continuity between the center pin of the coax and the antenna base, you
have an open. Fix it. (See "Testing Continuity") Exceptions: Some base
loaded antennas use a center tap design and there will be continuity from
ground to center conductor. Also, Firestik "No Ground Plane" antenna kits
will have coaxial center pin to ground continuity.
- SWR that pegs the needle on all channels almost always indicates a short in
your antenna system. Do not attempt to tune the antenna until the short is fixed.
Operating with high SWR will probably damage your CB's internal circuits.
- Make sure that the antenna you are using is the right antenna for your
application. Don't use a TV antenna or an AM/FM antenna for your CB. Do
not operate your CB without an antenna or dummy load.
- Transmitting antennas are sensitive to objects in their "near field of
radiation." Tune your antennas in an open area. Never tune inside or next to a
building, near or under trees, near or under power lines, and never with a
person holding or standing next to the antenna. Try to simulate normal
operating conditions.
- If you mount two or more antennas close to each other, you will alter the
transmission patterns of each one. The affect may be either positive or
negative. We recommend that a minimum of 12" exist between your CB
antenna and other types of antennas.
- Your radio cannot tell one component from another. As far as the radio is
concerned, the coax, stud mount, mounting bracket, antenna and vehicle is
ONE unit. Don't be too quick to fault your antenna until you are sure that all of
the other components have been given equal consideration.
- Of all antennas returned to Firestik for warranty service, 75% show no signs
of being tuned to the vehicle. All antennas should be checked prior to use.
Most will require some adjustment. Less than 3% of all returned antennas
have actual performance causing problems. Of those, half of the problems are
user or installer created. High SWR and other performance problems are 20
times more likely to be caused by bad coax, bad connections, shorted mounts,
poor installation location or faulty test meters.
- In almost every instance, once you get the same SWR reading on channels 1
and 40, further antenna tuning will not improve the readings. If the SWR is
still over 2:1, you have other problems to conquer. Exception: There are rare
occasions when the ground plane is so small or large that the system is way
out of phase (especially with high-performance antennas). If you have high
SWR on all channels and have confirmed that you have no opens or shorts in
the feedline, try making a small tuning adjustment in the antenna. There are
times when the SWR will drop equally across all channels under unusual
ground plane conditions. If you find this to be the case, carefully adjust the
antenna.
- SWR that is high on all channels (over 2:1 but not pegging the needle) after
the antenna has been tuned normally indicates a ground plane or coax cable
problem.
- The doors, mirrors, spare tire racks, luggage racks, etc. on many vehicles are
insulated from a good ground with nylon or rubber bushings. This also stands
true for fiberglass vehicles. Make sure that your antenna mount is grounded,
even if it entails running a ground wire to the vehicle chassis. Bad hard
ground at the mount generally equates to less than optimum performance.
Exception: No ground plane antenna kits do not require a grounded mount.
- If you are hearing whining noises from your radio while your vehicle is
running, it is probably due to "dirty power" being supplied to the radio. Under
dash power may be more convenient, but the "cleanest" power will be found
by running the radio's power leads straight to the battery.
- You can never buy coax cable that is too good for your system. Never
compromise quality for cost when purchasing coax. Your best bet is to stick
with coax that has a stranded center conductor and 90% or higher shielding.
- Most manufacturers of high performance antennas recommend a specific
length of coax cable. If your antenna manufacturer suggests a specific length,
give priority to that recommendation.
- If your ground plane is good, your mount grounded and, your antenna
favorably located, coax length rarely becomes an issue. But, if one or more
mismatches occur, you may find high SWR. This can often be corrected by
using 18 feet lengths of high quality coax.
- Excess coax between your radio and antenna mount should never be wound
into a circular coil of less than 12" in diameter. Doing so can cause system
problems. Your best option for handling excess coax is to serpentine the
cable into a 12 to 18 inch yarn-like skein. Secure the skein in the center with a
wire tie and tuck it away.
- Single antenna installations require coax with approximately 50 ohm's of
resistance (RG-58/U, RG-58 A/U or RG-8X). Dual antenna installations
require the use of 72 ohm cable (RG-59/U or RG-59 A/U).
- Coaxial cables with foam (polyfoam) center conductor insulation should be
your last choice for use on mobile (vehicle) installations. Even though it will
work initially, it has limited life and does not stand up to the conditions
encountered in the mobile environment. Choose coax with polyvinyl
insulation when doing mobile installs.
- Coax cables should never be cut and spliced together like common electrical
wire. Line losses will occur.
- Coaxial cable with holes in the outer insulation, severe bends, or door, trunk
or hood caused pinches will cause performance problems. Treat your coax
with care.
- If you live in an area where rain and/or sleet is common, wipe your antenna
down with a rag that has been coated with WD-40, Armor-All, Pledge, light
oil, etc. This trick prevents ice build up that can overload and cause your
antenna to break. In an emergency use butter, cooking oil or anything else that
will repel water.
- When tuning your antenna(s), make sure that you do so with the vehicle doors,
hood and trunk closed. If left open, they can cause inaccurate SWR readings.
Try to simulate actual operating conditions.
- Mobile antennas, for best performance, should have no less than 60% of their
overall length above the vehicles roof line. For co-phased antennas to
perform optimally, the space between the top 60% of the two antennas needs
to be unobstructed.
- Remember, all transmitting antennas need ground plane (counterpoise). Base
antennas, much like "no ground plane" antennas, build it in. Do not use mobile
antennas for base station applications unless you know how to build your own
ground plane.
- If you are installing a single antenna on one side or the other of your vehicle,
best on-the-road performance will be realized if the antenna is on the
passenger side of the vehicle.
- Co-phased (dual) antenna installations create a radiation pattern that favors
communication directly in front and back of the vehicle. This is why co-phase
systems are popular with people who do a lot of highway driving. Co-phase
antennas must be center or top loaded. Top loaded antennas are the best.
- Some people believe that co-phased antennas must be separated by a
minimum of nine (9) feet. We have successfully used co-phase antenna
systems with spacing as little as four (4) feet. Space alters the pattern and not
always negatively. Each vehicle will be different.
- Co-phase antennas can improve performance on vehicles that lack good
ground plane characteristics (fiberglass motorhomes, trucks, etc.). Instead of
using available metal to reflect the radiated energy, the antennas use each
others field.
- When tuning co-phased antennas (dual), it is best to adjust both antennas an
equal amount to maintain equality in their individual resonant frequency.
- On a co-phase system, if you try to tune each antenna independently using
RG-58 type coax and then connect them to the co-phasing harness, you will
almost always find that they will appear electrically short as a set. We
recommend that you first assemble the entire system. Take all measurements
and make all adjustments with both antennas in place.
- If you are experiencing SWR that is high across the entire band and have
eliminated shorts, opens, groundless mounts and coax as potential problems,
suspect lack of ground plane. Try adding a spring or quick disconnect to the
antenna base. In some cases, the repositioning of the antenna relevant to
available ground plane will solve the problem.
- One of the greatest benefits of the FS series (patented tunable tip) antenna is
noted when there is lack of available ground plane. If the tuning screw
reaches its "maximum out" position before satisfactory SWR is realized, a
common 1/4-20 threaded bolt or screw of a longer length can be used to
replace the supplied tuning screw. If the vinyl cap is too short to remain in
place, the user can disregard it or clip a hole in the top for the longer screw to
pass through.
- In rare instances, like antennas mounted in the middle of a metal van roof,
excess ground plane can cause a problem. This usually shows up as high
SWR across the band. In these cases, a tunable tip antenna may not be the best
choice. The reason being, the antenna is too long and the tunable tip cannot
adjust down far enough (see line 40). If you suspect this, an antenna that wire
can be removed from will usually fit the bill (i.e. KW or RP series).
- There may be situations when a tunable tip will bottom out before optimum
tuning is achieved. If this happens, try removing the knurled jam nut and finger
tighten the tuning screw against the o-ring. If still too long, remove the tuning
screw altogether. If total removal causes the antenna to go short, cut the tuning
screw in half and re-insert it into the tuning extender and re-test. The
following items on the FS Series "tunable tip" antennas, when removed, will
have an effect on SWR (in order from least effect to most effect). O-ring, jam
nut, tuning screw mass (cutting off length), vinyl cap, tuning screw complete.
- The vinyl cap on any "tunable tip" Firestik antennas is optional. However,
your antenna needs to be tuned as it will be used . . . with or without the tip.
- Magnetic mounts should be used in temporary situations only. If you leave
them in the same spot for a long period, the paint will not age like that of the
uncovered areas and/or moisture will be trapped between the mount and
vehicle causing rust or discoloration. Periodically lift the magnet and gently
clean off the underside of the magnet and the vehicle surface.
- It is a bad idea to use magnetic mounts and amplifiers together. Magnetic
mounts rely on capacitance grounding. This situation can literally cause the
paint under the mount to bubble or discolor due to excessive heat build up.
- On wire-wound antennas that require wire removal for tuning purposes, best
overall performance will be achieved by keeping the loose end of the wire
pressed down tightly against the wire coil. If you use power amplification on
top loaded antennas and do not process the end of the wire load so it can
dissipate its heat into other adjacent coils, you can melt the tip of the antenna.
- Generally speaking, center loaded antennas perform better than base loaded
antennas, and top loaded antennas perform better than all. For any given
antenna design (base, center or top loaded), the taller the antenna the better.
With length comes a wider bandwidth (lower SWR over more channels),
more power handling capability and overall performance increases.
- When ultimate mobile performance is desired, function should be given
precedence over mounting location convenience and appearance.
- Don't confuse SWR with overall performance. You should seek SWR of 2:1
or lower on channel 1 and 40, but keep in mind that best performance may not
be found at the lowest SWR readings. For the most part, if you get your SWR
below 2:1, on both ends of the band, don't be overly concerned about using
meter tricking procedures that bleed off energy.
- The SWR meters built into CB radios are okay for general readings, but are
rarely sensitive and/or accurate enough for fine tuning of antennas. Use them
mostly to indicate serious high SWR problems only.
- Firestik has tested literally hundreds of SWR meters. A large percentage of
these have shown to be off by 0.3 to 0.7 when compared to a piece of
certified equipment. There is no standard among production meters.
However, unless a unit is defective, most will indicate the most serious
problems that you might encounter
- Aside from cost, the type of wire used in or on antennas (copper, silver,
aluminum, gold, tinned, etc.) has negligible effect on antenna performance.
The antenna must be designed to resonate with the wire type and gauge chosen
by the designer. However, larger wire gauges will normally increase the
bandwidth and heat dissipation abilities of the antenna.
- Copper is 55% better than aluminum, 27% better than gold and 578% better
than tin insofar as conductivity is concerned. Silver will conduct AC/DC
current less than 2.5% more efficiently than copper, but the cost to
performance is generally unjustified and any gain, insofar as RF transmission
is concerned, is negligible.
- If devices other than an SWR meter are going to be used between the CB
radio and antenna, always tune the antenna system first without that device in
line. If SWR is high with the other device in line, you will know where the
problem is.
- In "no ground plane" systems, it is best to choose a system that terminates the
coaxial ground at the radio end of the cable. These systems are far less
reactive to cable routing errors and will almost always outperform systems
that are terminated at the antenna base or antenna end of the coax.
- Cables and antennas from standard & no-ground plane kits are not
interchangeable. The "No Ground Plane" antennas from Firestik have a
yellow band near the base.
- Wire wound antennas with a plastic outer coating will greatly reduce audible
RF static when compared to metal whip antennas.
- If you leave your antenna on your vehicle permanently, remove the rubber
o-ring that is found on the threaded base of some antennas. Tighten permanent
antennas with a wrench. Add a lock washer if you want.
- If you use mirror mounts and often find yourself in areas with overhead
obstructions, tighten the bolts just enough to keep the antenna vertical at
highway speeds. If the antenna contacts something overhead, the mount will
rotate on the mirror arm and protect your antenna.
- If you use long antennas and find that they bend too far back at highway
speeds, tilt them forward if possible. When under a wind load, they will end
up in a relatively vertical position.
- On antennas that are topped off with a vinyl tip, make sure that you take your
SWR measurements with the tip in place. If you tune your antenna with the tip
off and then reinstall the tip, your SWR will change.
- Without advocating the use of power amplifiers or unauthorized channels,
take note that the Firestik II tunable tip antennas have a fairly large metal tip
that broadens the bandwidth and dissipates a considerable amount of heat.
- It is illegal to use power amplifiers with CB radios. It is illegal to "tweak"
the radios internal circuits to increase output power. The transmitter power of
a legal, FCC certified CB radio is 4 watts AM.
- If having one antenna for CB/AM/FM is appealing, use a CB antenna and a
splitter that allows it to be connected to your AM/FM radio. Devices that let
you use your AM/FM antenna for CB use will leave you disappointed.
- On a budget? Buy a cheap radio and a good antenna. Aside from added bells
and whistles, all CB's are FCC regulated to transmit no more than 4 watts of
power. A good antenna on an inexpensive radio will almost always
outperform a bad antenna on an expensive radio.
- Beware of the wire wound mobile antennas mentioned in ads that claim them
to be "full-wave" or "wave and a half". At best, you are being deceived by
the misleading association of wire length to actual performance
characteristics. Wire length, for all intents and purposes, is irrelevant. With
"very" few exceptions, antennas must function as a 1/4 wave or 5/8 wave to
be useful on mobile installations. For example, Firestik and Firestik II
antennas between 2 foot and 5 foot have a radiation pattern similar to a 5/8
wave reference antenna. However, wire lengths range from 20 feet to 32 feet
(0.6 to 0.9 of a full wave length). If wire length was relevant, each antenna
would need 22.5 feet of wire.
TESTING CONTINUITY
Checking your CB antenna system for continuity, shorts and opens is a MUST
process and should always precede SWR checks and settings. Exception: Cable
supplied with 'No Ground Plane' antenna kits will have continuity between the
center lead and ground.
SETTING THE SWR OF YOUR ANTENNA
SWR (standing wave ratio), is a measurement of how efficiently your antenna
system will radiate the power available from your radio. In simple terms, your
radio would like to radiate all of its power, but can only do so if the other
components cooperate. Bad coax and mounts, or inefficient antennas and ground
plane can cause system bottlenecks. The easiest way to understand the concept is
to think of it in terms of water flow. That is, if you put a one inch faucet on a two
inch pipe, your potential output will be restricted by the one inch outlet. So goes
antenna systems. Setting your antennas SWR will reduce the restriction of radiated
power.
If all radios only transmitted on one channel, it would be a much easier task to
design antennas. As it is, on CB alone, there are 40 channels to contend with.
Mobile antennas can only be made to resonate at one specific frequency (channel).
The goal of the antenna manufacturers is to build the antenna to resonate at a
frequency in the middle of the available band (channel 19 on CB) and make it
broad- banded enough to keep the off-frequency related SWR at the two extreme
ends of the band below 2.0:1. It should be noted that if you communicate on one or
two adjacent channels anywhere within the band, you can tune your antenna to
achieve optimum performance on those channels. Most people, however, prefer to
use the entire bandwidth when tuning.
THINGS YOU WILL NEED
- Knowledge of what not to do .... read previous sections.
- Properly installed antenna system (mount, coax and antenna) that was made
for the type of radio you will be using and has been tested for shorts and
opens in continuity. (See "Testing Continuity")
- Functional radio.
- SWR meter. (See "SWR Meter Hook-Up")
- Short piece of coaxial cable (jumper) with PL-259 connectors on both end.
SWR METER HOOK-UP
The SWR of the antenna, without feedline, can be measured by placing the SWR
meter in-line at the antenna instead of at the radio. However, the coax can help or
hinder performance. In the end, your SWR should be checked at the radio end
because all components will be a part of the final operational system being used.
SWR TESTING REMINDERS:
- Remember to check for continuity, shorts and opens in your coax and mount
installation first.
- Take measurements in an open area with the vehicle's doors and hatches
closed.
- All measurements should be taken with antenna tip on, unless you do not plan
to use the tip in normal use.
THE SET UP
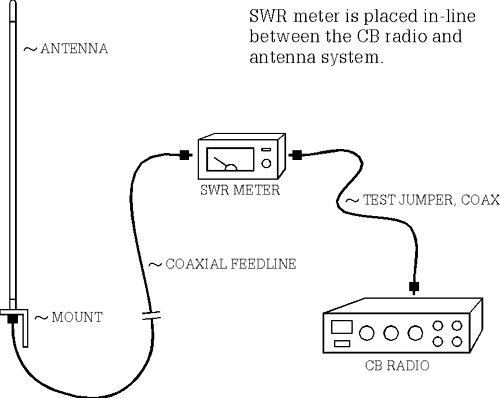
If already connected, disconnect the coaxial cable from the radio. Connect the coax
cable that normally connects to the back of the radio to the SWR meter connector
marked "Antenna" or "Ant". Now, connect one end of the jumper cable to the back
of the radio and the other end to the SWR meter connection marked "Transmitter"
or "Xmit". Your SWR meter is now in series (in-line) with your radio and antenna.
Since you've already read the previous parts of this pamphlet, you should now
have your vehicle in an open area, with all doors closed. Turn your radio on and
tune to channel one or the lowest channel on your radio. If your radio has side band
operation, make sure you are in AM mode before doing SWR tests.
The following assumes that your SWR meter has a standard set of switches, knobs
and meters. That is, there will be at least one switch with the marking Forward
(FWD) in one position and Reference (REF or SWR) in the other. There will also
be a knob or sliding controller marked "Set" or "Adjust". Most meters come with
full instructions. If the common configuration does not match your meter you will
need to rely on the meters manual for assistance.
With the radio on the lowest channel (1 on CB) and the SWR meters switch in the
Forward (FWD) position, depress the transmit switch (key up) located on the
microphone. While holding the unit in this transmit mode, adjust the meter needle
to the set position using the Set or Adjust knob on the meter. As soon as the needle
is in alignment with the corresponding mark on the meter face, flip the switch to the
Reference (REF) position. The meter is now showing your SWR on channel one.
Note the value and quickly release the microphone switch. Record this reading on
your paper to the nearest 1/10th. i.e. 1.8, 2.3, 2.7, 1.4, etc.
Now, switch your radio to the middle channel (19 on CB). Place the meter switch
in the Forward (FWD) position, depress the microphone switch and adjust the
meter to place the needle on the Set position of the meter face. Once in the set
position, place the meter switch in the Reference (REF) position and note the
reading. Release the microphone switch and write this value down to the nearest
tenth of a point. Note: If your antenna system is closely matched to the radio you
may get little or no movement from the meter needle on this channel. This is
normal.
Finally, place your radio on the highest number channel (40 on CB). Place the
meter switch in the Forward (FWD) position, depress the microphone switch and
adjust the meter to place the needle on the Set position of the meter face. Once in
the set position, place the meter switch in the Reference (REF) position and note
the reading. Release the microphone switch and write this value down to the
nearest tenth of a point.
With these three readings, you can determine many things about your system. For
instance ...
- If SWR on channels 1, 19 & 40 is below 2.0, your radio can be safely
operated on any channel without causing damage to the radio's circuitry.
- If SWR on all channels is above 2.0 but not in the "red zone" (normally over
3.0), you may be experiencing coaxial cable reaction (bad quality, wrong
length, etc.), insufficient ground plane, or have an ungrounded antenna mount.
- If SWR is in the "red zone" on all channels, you probably have an electrical
short in your coax connectors, or your mounting stud was installed incorrectly
and is shorted. DO NOT USE YOUR RADIO UNTIL YOU HAVE FOUND
THE PROBLEM.
- If SWR on the lowest channel is higher than it is on the highest channel, your
antenna system appears to be electrically short. See the following section title
"Adjusting Short Antennas".
ADJUSTING LONG ANTENNAS
If the SWR on channel 40 is greater than that on channel 1, your antenna is
considered to be "LONG" and reduction of physical height and/or conductor length
will correct this situation. Depending upon antenna model, this entails screwing
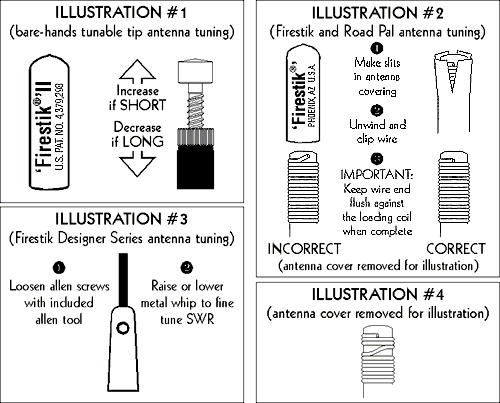
down the tunable tip (Illustration #1: Firestik II, Firefly), or, removing the tip,
making short slits in the plastic covering and unwinding and clipping off wire
(Illustration #2: Firestik, Road Pal). Firestik Designer Series antennas require
loosening the allen screws and lowering the metal whip (Illustration #3).
ADJUSTING SHORT ANTENNAS
If SWR on channel 1 is greater than that on channel 40, your antenna is considered to be "SHORT" and increasing the physical and/or electrical length of the antenna
is required to correct this situation. Because we make our antennas extra long, readings which indicate "Short" normally stem from ground plane deficiency (lack of vehicle metal surface for the antenna to reflect its signal rom). This condition is often corrected by adding a spring and/or quick disconnect to increase the physical height. Ground plane deficiencies can also be compensated for by using dual (co-phased) antennas or special no-ground-plane antenna kits.
Lengthening of the Firestik II and Firefly is accomplished by turning the tuning screw further out (Illustration #1). On Firestik and Road Pal models, it requires tip removal, short slits in the plastic covering and, the separation and upward repositioning of three or more wire turns (Illustration #4). Firestik Designer Series antennas require loosening the allen screws and raising the metal whip (Illustration #3).
NOTE: The shorter the antenna, the more sensitive it is to adjustments. For example, removing two wire turns on a 4 foot antenna might move the SWR by 0.3; the same amount removed from a 2 foot antenna may move the SWR by 1.0. Make smaller adjustments on shorter antennas.
DUAL ANTENNAS
Measurements and determination of short or long conditions are the same as the
single antenna procedure. However, when tuning co-phased antennas, if you adjust
one antenna, it is advisable to adjust the other in equal amounts to keep them in
perfect balance.
COAX CABLE PROCESSING with FIRESTIK CONNECTORS
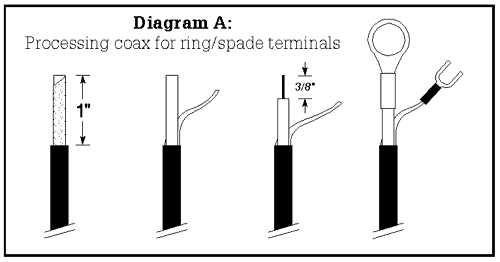
Using ring/spade terminals
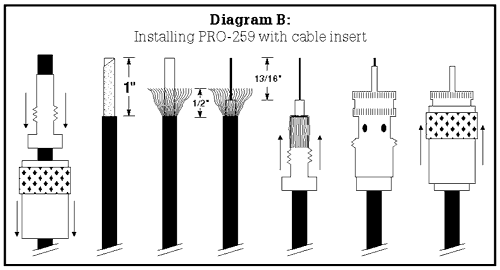
Using PRO-259 with cable type insert.
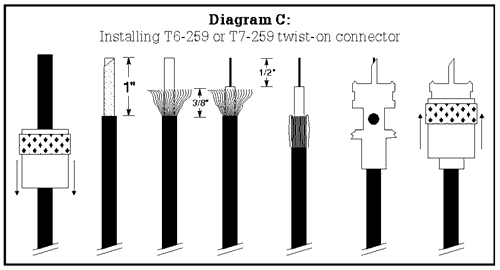
Using Twist-On connector (T6-259 or T7-259)
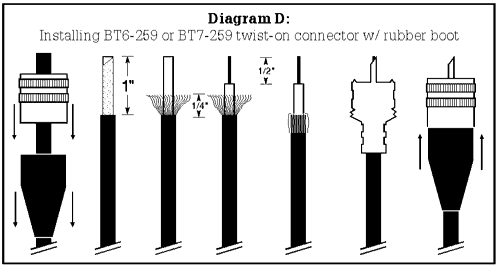
Using Twist-On connector w/ rubber boot
(BT6-259 or BT7-259)
Using CP-259 to build co-phasing harness
THINGS TO KNOW
- RG-58 refers to any RG-58 type cable such as RG-58-U or RG-58-A/U.
- RG-59 refers to any RG-59 type cable such as RG-59-U or RG-59-A/U.
- The "A" designation after RG-58 or RG-59 indicates a stranded center
conductor, wire made up of numerous individual strands versus one solid
wire.
- RG-58 type coax is 50 ohm cable and is used for single antenna installations
of CB, scanner, 2-meter, and 10-meter Firestik antennas. RG-8 and RG-8X
are other common coax types that can be used on single antenna installations.
- RG-59 type coax is 72 ohm cable. It is used for dual (co-phased) CB, 2-meter
or 10-meter installations. It is also commonly used for TV antennas and
AM/FM receive only antennas. Do not use this coax on single CB antenna
installations.
- The length, type and quality of the coaxial feedline can have a major effect on
system performance. If in doubt, use 18ft coax that has the "A" designation
after the RG type.
- The coax used on Firestik "no-ground-plane" kits must never be altered. It's
length and internal features are critical to proper operation.
- The shield on "no-ground-plane" kits is intentionally not used at the mount end
of the coax. Leave as is.
- The shield portion of the coax cable is almost always used as the ground.
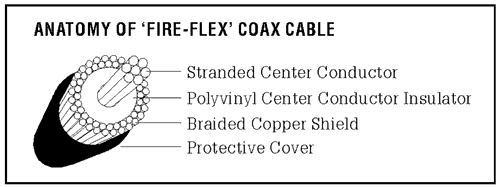
- Remove 1" (38 mm) of the cable's protective cover (see Diagram A, next
page).
- Use end of nail or other pointed object to unbraid the copper shield. When
done, pull to one side and twist into a single wire. Trim off any loose ends.
- Remove 3/8" (10 mm) of the center conductor insulation and dress by twisting
strands into one wire.
- If soldering equipment is available, tin the ends of both wires.
- If shrink tubing will be used for additional insulation, slide over wire end(s)
at this time.
- Crimp and/or solder terminal(s) to appropriate wire. In most cases, the larger
of the two terminals will go on the center conductor. If both terminals are the
same size but one has it's own insulation, this should be used on the center
conductor.
- If shrink tubing was used, slip it over the terminal end and heat until properly
fitted.
- Test your work for opens or shorts (see "Testing Continuity").
NOTE: Soldering iron and solder required for this connector.
- Slide appropriate cable adapter over coax, INS-58 for RG58 cable or INS-59
for RG59 or RG8X cable. Make sure wide shoulder is down, threaded
portion up (see Diagram B).
- Remove (unscrew) PRO-259 knurled barrel sleeve from main connector and
drop over coax. Make sure that the internal threads are up.
- Remove 1" (25 mm) of the cables outer cover.
- Use end of nail or other pointed object to unbraid the copper shield. Trim to
approximately 1/2" (12mm) long all the way around.
- Remove 1/2" ( 12 mm) of the center conductor insulation and dress by
twisting all strands into one wire.
- Use your soldering iron to tin the end of the center conductor wire.
- Slide the insert up the cable until the top is even with the trimmed edge of the
outer cover. Fold the braided shield over the top of the insert. Make sure the
wire does not lay in the treads of the insert. If the braid is a little long,
twisting the braid around the insert will keep it out of the threads.
- Thread the main connector body on to the cable insert until fully seated.
Locate shield through one or more holes in main body. Heat body and shield
at one or more access holes and fill with solder.
- Solder center conductor where it protrudes from center pin of main body. Do
not over fill or pin will be to fat to fit into mating connector. Trim off any
excess wire.
- Slide the knurled barrel up the cable and re-thread to the main body.
- Test your work for opens or shorts (see "Testing Continuity").
INSTALLING T6-259 OR T7-259 TWIST-ON CONNECTOR
Note: Soldering iron and solder required for this connector.
- Select appropriate connector for cable type, T6 for RG-58 or T7 for RG-59
coax.
- Remove (unscrew) knurled barrel sleeve from main connector and drop over
coax. Make sure that the internal threads are up (see Diagram C).
- Remove 1" ( 25 mm) of cables outer cover.
- Use end of nail or other pointed object to unbraid the copper shield. Trim to
approximately 3/8" (10mm) long all the way around.
- Remove 1/2" ( 12 mm) of the center conductor insulation and dress by
twisting all strands into one wire.
- Use your soldering iron to tin the end of the center conductor wire.
- Fold the braided shield down over the top of the outer cover.
- Thread the main connector body on to the cable until fully seated or the center
conductor is at the end of the main body center pin.
- Solder center conductor where it protrudes from center pin of main body. Do
not over fill or pin will be to fat to fit into mating connector. Trim off any
excess wire.
- Slide the knurled barrel up the cable and re-thread to the main body.
- Test your work for opens or shorts (see "Testing Continuity").
INSTALLING BT6-259 OR BT7-259 TWIST-ON CONNECTOR W/ RUBBER
BOOT
Note: Soldering iron and solder required for this connector.
- Select appropriate connector for cable type, BT6 for RG-58 or BT7 for
RG-59 coax.
- Slide rubber boot over cable with large opening up.
- Remove (unscrew) knurled barrel sleeve from main connector and drop over
coax. Make sure that the internal threads are up (see Diagram D).
- Remove 1" (25 mm) of cables outer cover.
- Use end of nail or other pointed object to unbraid the copper shield. Trim to
approximately 1/4" (6mm) long all the way around.
- Remove 1/2" (12 mm) of the center conductor insulation and dress by twisting
all strands into one wire.
- Use your soldering iron to tin the end of the center conductor wire.
- Fold the braided shield down over the top of the outer cover.
- Thread the main connector body on to the cable until fully seated or the center
conductor is at the end of the main body center pin.
- Solder center conductor where it protrudes from center pin of main body. Do
not over fill or pin will be to fat to fit into mating connector. Trim off any
excess wire.
- Slide the knurled barrel up the cable and re-thread to the main body.
- Slide rubber boot up cable and snap over the main body (2 clicks)
- Test your work for opens or shorts (see "Testing Continuity").
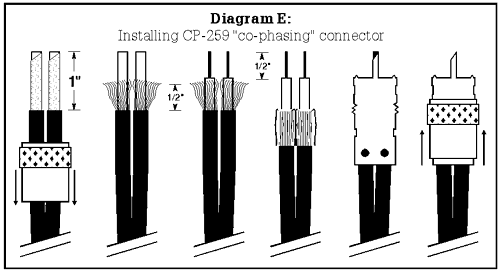
INSTALLING CP-259 "CO-PHASING HARNESS" CONNECTOR
Note: Soldering iron and solder required for this connector.
- Remove (unscrew) knurled barrel sleeve from main connector and drop over
both pieces of coax. Make sure that the internal threads are up (see Diagram
E).
- Remove 1" (25 mm) of both cables outer cover.
- Use end of nail or other pointed object to unbraid the copper shield. Trim to
approximately 1/2" (12mm) long all the way around.
- Remove 1/2" (12 mm) of the center conductor insulation from both cables and
dress each by twisting all strands together.
- Use your soldering iron and lightly tin the ends of both center conductor
wires.
- Fold the braided shield down over the top of the outer cover on both cables.
- Insert each cable into the connector body making sure the center conductor
protrudes from the body center pin.
- Solder center conductor where it protrudes from center pin of main body. Do
not over fill or pin will be to fat to fit into mating connector. Trim off any
excess wire.
- Solder the shield on both cables to the main body using the corresponding
access hole.
- Slide the knurled barrel up the cable and re-thread to the main body.
- Test your work for opens or shorts (see "Testing Continuity").
NOTE: If you will be using grommets to protect your cable where it passes through
the vehicle body, make sure the grommets are on the cable before processing
connector(s).
Firestik® Antenna Company
manufactures a complete line of antennas
and accessories for CB, scanner and
amateur radio equipment.
write to:
Firestik® Antenna Company
2614 E Adams St
Phoenix, Arizona
85034-1495
(e-mail) firestik@primenet.com
or firestik1@aol.com
or call:
(tel) 602-273-7151
(fax) 602-273-1836
FIRESTIK TECHNICAL SUPPORT HELP LINE: 1-602-273-7152


