What Connector are you installing?
Ring/spade terminals
PRO-259 Pro-Style with insert.
T6-259 & T7-259 Bootless Twist-On
BT6-259 & BT7-259 Booted Twist-On
CP-259 Co-Phasing Harness Connector
THINGS TO KNOW
- RG-58 refers to any RG-58 type cable such as RG-58-U or RG-58-A/U.
- RG-59 refers to any RG-59 type cable such as RG-59-U or RG-59-A/U.
- The "A" designation after RG-58 or RG-59 indicates a stranded center
conductor, wire made up of numerous individual strands versus one solid
wire.
- RG-58 type coax is 50 ohm cable and is used for single antenna installations
of CB, scanner, 2-meter, and 10-meter Firestik antennas. RG-8 and RG-8X
are other common coax types that can be used on single antenna installations.
- RG-59 type coax is 72 ohm cable. It is used for dual (co-phased) CB, 2-meter
or 10-meter installations. It is also commonly used for TV antennas and
AM/FM receive only antennas. Do not use this coax on single CB antenna
installations.
- The length, type and quality of the coaxial feedline can have a major effect on
system performance. If in doubt, use 18ft coax that has the "A" designation
after the RG type.
- The coax used on Firestik "no-ground-plane" kits must never be altered. It's
length and internal features are critical to proper operation.
- The shield on "no-ground-plane" kits is intentionally not used at the mount end
of the coax. Leave as is.
- The shield portion of the coax cable is almost always used as the ground.

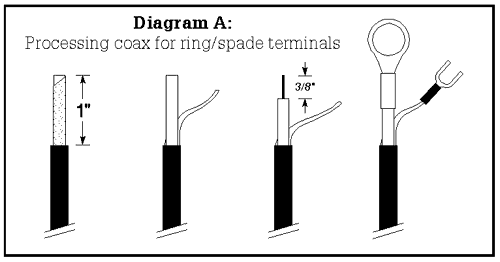
- Remove 1" (38 mm) of the cable's protective cover (see Diagram A, next
page).
- Use end of nail or other pointed object to unbraid the copper shield. When
done, pull to one side and twist into a single wire. Trim off any loose ends.
- Remove 3/8" (10 mm) of the center conductor insulation and dress by twisting
strands into one wire.
- If soldering equipment is available, tin the ends of both wires.
- If shrink tubing will be used for additional insulation, slide over wire end(s)
at this time.
- Crimp and/or solder terminal(s) to appropriate wire. In most cases, the larger
of the two terminals will go on the center conductor. If both terminals are the
same size but one has it's own insulation, this should be used on the center
conductor.
- If shrink tubing was used, slip it over the terminal end and heat until properly
fitted.
- Test your work for opens or shorts (see "Testing Continuity").
NOTE: Soldering iron and solder required for this connector.
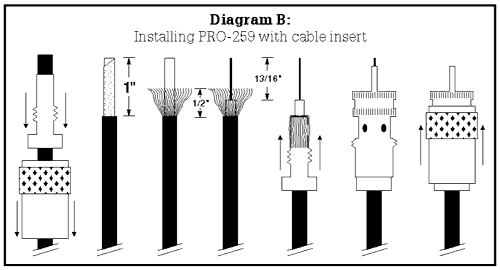
- Slide appropriate cable adapter over coax, INS-58 for RG58 cable or INS-59
for RG59 or RG8X cable. Make sure wide shoulder is down, threaded
portion up (see Diagram B).
- Remove (unscrew) PRO-259 knurled barrel sleeve from main connector and
drop over coax. Make sure that the internal threads are up.
- Remove 1" (25 mm) of the cables outer cover.
- Use end of nail or other pointed object to unbraid the copper shield. Trim to
approximately 1/2" (12mm) long all the way around.
- Remove 1/2" ( 12 mm) of the center conductor insulation and dress by
twisting all strands into one wire.
- Use your soldering iron to tin the end of the center conductor wire.
- Slide the insert up the cable until the top is even with the trimmed edge of the
outer cover. Fold the braided shield over the top of the insert. Make sure the
wire does not lay in the treads of the insert. If the braid is a little long,
twisting the braid around the insert will keep it out of the threads.
- Thread the main connector body on to the cable insert until fully seated.
Locate shield through one or more holes in main body. Heat body and shield
at one or more access holes and fill with solder.
- Solder center conductor where it protrudes from center pin of main body. Do
not over fill or pin will be to fat to fit into mating connector. Trim off any
excess wire.
- Slide the knurled barrel up the cable and re-thread to the main body.
- Test your work for opens or shorts (see "Testing Continuity").
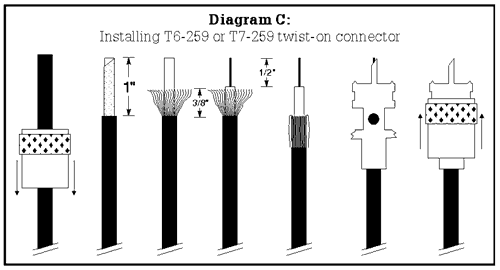
INSTALLING T6-259 OR T7-259 TWIST-ON CONNECTOR
Note: Soldering iron and solder required for this connector.
- Select appropriate connector for cable type, T6 for RG-58 or T7 for RG-59
coax.
- Remove (unscrew) knurled barrel sleeve from main connector and drop over
coax. Make sure that the internal threads are up (see Diagram C).
- Remove 1" ( 25 mm) of cables outer cover.
- Use end of nail or other pointed object to unbraid the copper shield. Trim to
approximately 3/8" (10mm) long all the way around.
- Remove 1/2" ( 12 mm) of the center conductor insulation and dress by
twisting all strands into one wire.
- Use your soldering iron to tin the end of the center conductor wire.
- Fold the braided shield down over the top of the outer cover.
- Thread the main connector body on to the cable until fully seated or the center
conductor is at the end of the main body center pin.
- Solder center conductor where it protrudes from center pin of main body. Do
not over fill or pin will be to fat to fit into mating connector. Trim off any
excess wire.
- Slide the knurled barrel up the cable and re-thread to the main body.
- Test your work for opens or shorts (see "Testing Continuity").
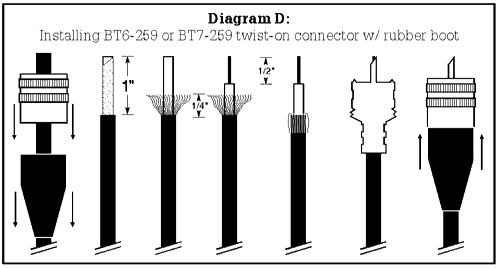
INSTALLING BT6-259 OR BT7-259 TWIST-ON CONNECTOR W/ RUBBER
BOOT
Note: Soldering iron and solder required for this connector.
- Select appropriate connector for cable type, BT6 for RG-58 or BT7 for
RG-59 coax.
- Slide rubber boot over cable with large opening up.
- Remove (unscrew) knurled barrel sleeve from main connector and drop over
coax. Make sure that the internal threads are up (see Diagram D).
- Remove 1" (25 mm) of cables outer cover.
- Use end of nail or other pointed object to unbraid the copper shield. Trim to
approximately 1/4" (6mm) long all the way around.
- Remove 1/2" (12 mm) of the center conductor insulation and dress by twisting
all strands into one wire.
- Use your soldering iron to tin the end of the center conductor wire.
- Fold the braided shield down over the top of the outer cover.
- Thread the main connector body on to the cable until fully seated or the center
conductor is at the end of the main body center pin.
- Solder center conductor where it protrudes from center pin of main body. Do
not over fill or pin will be to fat to fit into mating connector. Trim off any
excess wire.
- Slide the knurled barrel up the cable and re-thread to the main body.
- Slide rubber boot up cable and snap over the main body (2 clicks)
- Test your work for opens or shorts (see "Testing Continuity").
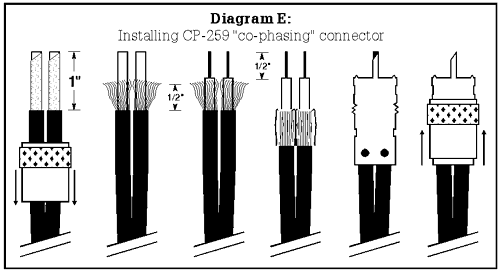
INSTALLING CP-259 "CO-PHASING HARNESS" CONNECTOR
Note: Soldering iron and solder required for this connector.
- Remove (unscrew) knurled barrel sleeve from main connector and drop over
both pieces of coax. Make sure that the internal threads are up (see Diagram
E).
- Remove 1" (25 mm) of both cables outer cover.
- Use end of nail or other pointed object to unbraid the copper shield. Trim to
approximately 1/2" (12mm) long all the way around.
- Remove 1/2" (12 mm) of the center conductor insulation from both cables and
dress each by twisting all strands together.
- Use your soldering iron and lightly tin the ends of both center conductor
wires.
- Fold the braided shield down over the top of the outer cover on both cables.
- Insert each cable into the connector body making sure the center conductor
protrudes from the body center pin.
- Solder center conductor where it protrudes from center pin of main body. Do
not over fill or pin will be to fat to fit into mating connector. Trim off any
excess wire.
- Solder the shield on both cables to the main body using the corresponding
access hole.
- Slide the knurled barrel up the cable and re-thread to the main body.
- Test your work for opens or shorts (see "Testing Continuity").
NOTE: If you will be using grommets to protect your cable where it passes through
the vehicle body, make sure the grommets are on the cable before processing
connector(s).
|

