Setting the SWR of Your Antenna
Compliments of Firestik® Antenna Company Technical Support Team
Copyright © 1996 Firestik® Antenna Company
|
SWR (standing wave ratio), is a measurement of how efficiently your antenna system will radiate the power available from your radio. In simple terms, your radio would like to radiate all of its power, but can only do so if the other components cooperate. Bad coax and mounts, or inefficient antennas and ground plane can cause system bottlenecks. The easiest way to understand the concept is to think of it in terms of water flow. That is, if you put a one inch faucet on a two inch pipe, your potential output will be restricted by the one inch outlet. So goes antenna systems. Setting your antennas SWR will reduce the restriction of radiated power. If all radios only transmitted on one channel, it would be a much easier task to design antennas. As it is, on CB alone, there are 40 channels to contend with. Mobile antennas can only be made to resonate at one specific frequency (channel). The goal of the antenna manufacturers is to build the antenna to resonate at a frequency in the middle of the available band (channel 19 on CB) and make it broad- banded enough to keep the off-frequency related SWR at the two extreme ends of the band below 2.0:1. It should be noted that if you communicate on one or two adjacent channels anywhere within the band, you can tune your antenna to achieve optimum performance on those channels. Most people, however, prefer to use the entire bandwidth when tuning. 
THINGS YOU WILL NEED
SWR METER HOOK-UPThe SWR of the antenna, without feedline, can be measured by placing the SWR meter in-line at the antenna instead of at the radio. However, the coax can help or hinder performance. In the end, your SWR should be checked at the radio end because all components will be a part of the final operational system being used. SWR TESTING REMINDERS:
|
THE SET UP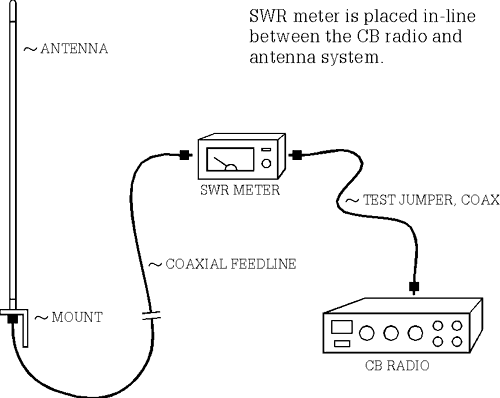 If already connected, disconnect the coaxial cable from the radio. Connect the coax cable that normally connects to the back of the radio to the SWR meter connector marked "Antenna" or "Ant". Now, connect one end of the jumper cable to the back of the radio and the other end to the SWR meter connection marked "Transmitter" or "Xmit". Your SWR meter is now in series (in-line) with your radio and antenna. Since you've already read the previous parts of this pamphlet, you should now have your vehicle in an open area, with all doors closed. Turn your radio on and tune to channel one or the lowest channel on your radio. If your radio has side band operation, make sure you are in AM mode before doing SWR tests. The following assumes that your SWR meter has a standard set of switches, knobs and meters. That is, there will be at least one switch with the marking Forward (FWD) in one position and Reference (REF or SWR) in the other. There will also be a knob or sliding controller marked "Set" or "Adjust". Most meters come with full instructions. If the common configuration does not match your meter you will need to rely on the meters manual for assistance. With the radio on the lowest channel (1 on CB) and the SWR meters switch in the Forward (FWD) position, depress the transmit switch (key up) located on the microphone. While holding the unit in this transmit mode, adjust the meter needle to the set position using the Set or Adjust knob on the meter. As soon as the needle is in alignment with the corresponding mark on the meter face, flip the switch to the Reference (REF) position. The meter is now showing your SWR on channel one. Note the value and quickly release the microphone switch. Record this reading on your paper to the nearest 1/10th. i.e. 1.8, 2.3, 2.7, 1.4, etc. Now, switch your radio to the middle channel (19 on CB). Place the meter switch in the Forward (FWD) position, depress the microphone switch and adjust the meter to place the needle on the Set position of the meter face. Once in the set position, place the meter switch in the Reference (REF) position and note the reading. Release the microphone switch and write this value down to the nearest tenth of a point. Note: If your antenna system is closely matched to the radio you may get little or no movement from the meter needle on this channel. This is normal. Finally, place your radio on the highest number channel (40 on CB). Place the meter switch in the Forward (FWD) position, depress the microphone switch and adjust the meter to place the needle on the Set position of the meter face. Once in the set position, place the meter switch in the Reference (REF) position and note the reading. Release the microphone switch and write this value down to the nearest tenth of a point. With these three readings, you can determine many things about your system. For instance ...
ADJUSTING LONG ANTENNASIf the SWR on channel 40 is greater than that on channel 1, your antenna is considered to be "LONG" and reduction of physical height and/or conductor length will correct this situation. Depending upon antenna model, this entails screwing down the tunable tip (Illustration #1: Firestik II, Firefly), or, removing the tip, making short slits in the plastic covering and unwinding and clipping off wire (Illustration #2: Firestik, Road Pal). Firestik Designer Series antennas require loosening the allen screws and lowering the metal whip (Illustration #3). ADJUSTING SHORT ANTENNASIf SWR on channel 1 is greater than that on channel 40, your antenna is considered to be "SHORT" and increasing the physical and/or electrical length of the antenna is required to correct this situation. Because we make our antennas extra long, readings which indicate "Short" normally stem from ground plane deficiency (lack of vehicle metal surface for the antenna to reflect its signal from). This condition is often corrected by adding a spring and/or quick disconnect to increase the physical height. Ground plane deficiencies can also be compensated for by using dual (co-phased) antennas or special no-ground-plane antenna kits. Lengthening of the Firestik II and Firefly is accomplished by turning the tuning screw further out (Illustration #1). On Firestik and Road Pal models, it requires tip removal, short slits in the plastic covering and, the separation and upward repositioning of three or more wire turns (Illustration #4). Firestik Designer Series antennas require loosening the allen screws and raising the metal whip (Illustration #3). NOTE: The shorter the antenna, the more sensitive it is to adjustments. For example, removing two wire turns on a 4 foot antenna might move the SWR by 0.3; the same amount removed from a 2 foot antenna may move the SWR by 1.0. Make smaller adjustments on shorter antennas. DUAL ANTENNASMeasurements and determination of short or long conditions are the same as the single antenna procedure. However, when tuning co-phased antennas, if you adjust one antenna, it is advisable to adjust the other in equal amounts to keep them in perfect balance. 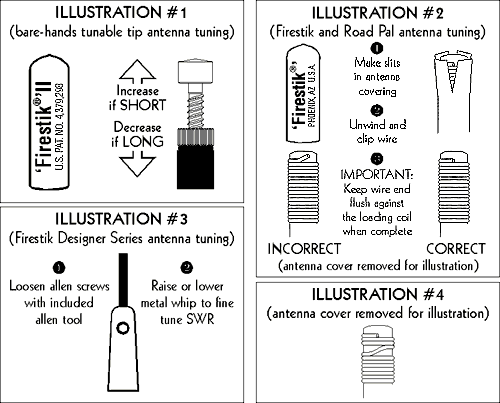 |

Updated: 2023.12.05
Last Revised: June 6, 2006